
The balance sheet goes out of balance if the total assets do not match the total liabilities. It happens due to a damaged company file or the transaction that you’ve entered or linked are not compatible.
The sum of Total Liabilities and Total Equities on a balance sheet should always equal Total Asset. Due to poorly entered or linked transactions, your balance sheet can appear to be out of balance. As a result, you can get a balance sheet out of the balance in QuickBooks if numbers aren’t in sync. QuickBooks also tracks revenues and expenses as they occur, regardless of modifications in cash flow. Depending on the report, your balance sheet may display variances. However, the good thing is that you can amend this problem by yourself. This article tells you how you can overcome this issue with ease.
How Important is a balance sheet?
Your balance sheet plays an extremely vital role in attracting investors. Also, it enables the company to represent its worth aptly. The balance sheet showcases the financial situation of the firm at any certain point in time. It shows how much liabilities, assets as well as equity the organization has at present. The sheet can easily show the total amount of assets, and money a firm owns as well as what it owes.
How does the balance sheet get out of balance?
In case, the balance sheet on an accrual basis appears as out of balance, then it implies that the sum of total assets is not at all equal to the amount of the sum of liabilities and the sum of the equities.
Three main causes that lead to this issue are:
- In case the data file is corrupted.
- When the transactions that were entered are not attuned.
- When you use multi-currency.
Similar Issue: QuickBooks Retained Earnings Incorrect
How to Fix Issue QuickBooks Balance Sheet Out of Balance
There are several steps involved in correcting the balance sheet unbalance error in QuickBooks Desktop.
- Run the report on an accrual basis.
- Look for the date when your balance sheet went out of balance.
- Find the transactions that are making your balance sheet out of balance.
- Re-date the transactions.
- Delete and re-enter the transactions.
Step 1: Run the report on an accrual basis
Make sure you run your report on an accrual basis if you haven’t already. Here’s how:
- First, select the Company & Financial >>> Balance Sheet Summary from the Reports menu
- Next, select the “Customize Report” tab.
- Now go to the Display tab and select “Accrual” under the Report Basis.
- At last, hit the “Ok” button.
If your accrual balance sheet is out of balance, you need first to rebuild your company file. Continue to Step 2 if it’s out of balance simply on a cash basis, or if it’s still out of balance after a rebuild.
Step 2: Look for the date when your balance sheet went out of balance
Below are the steps to find out the date when a particular report became out of balance which helps you to trace the transactions that are causing this problem:
- In the beginning, move to the Reports menu and then select “Company & Financials” >>> “Balance Sheet Summary”.
- After that, select the tab “Customize Report”.
- Then go to the Display tab and select “All” from the Dates dropdown.
- Next, move to the Report Basis section and select Accrual if your balance sheet is out of balance in accrual only, if not, go with Cash.
- Now, select “Year” from the Display columns by dropdown within the Columns section
- Once done then click on the Ok button.
- In the end, comparing Total Assets to Total Liabilities and Equity is a good way to start and also determine when your balance sheet is going out of balance.
After finding the year, you have to perform the same steps to narrow down the exact date
- In this, you have to repeat the same steps as discussed above from 1 to 6.
- This time, you have to select the “Month” from the Display columns by dropdown.
- Again, follow 1 to 6 steps after finding the accurate month and then select “Week”.
- Once you find the week then repeat the same steps to select “Day”.
- Finally, you have to check the date your report went out of balance, if yes then continue the further step 3.
Step 3: Find the transactions that are making your balance sheet out of balance
Below are the steps for creating a custom transaction detail report after you set the date that the balance issue occurred in the QuickBooks balance sheet. This will help you identify the transaction that caused the error:
- First, go to the Reports menu and then select “Custom Report” >>> “Transaction Detail”.
- Look for the Report Date Range section within the Modify Report window.
- Now, enter the report date that went out of balance within the From and To fields.
- Next, move to the Report Basis section, and if your balance sheet is out of balance in accrual only then you simply select “Accrual” otherwise, select the “Cash” option.
- Uncheck the Account >>> Split >>> Clr >>> Class within the Columns section.
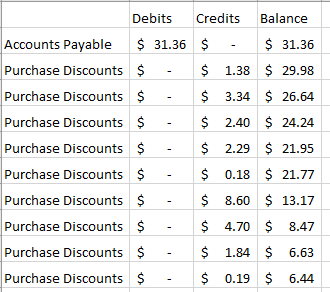
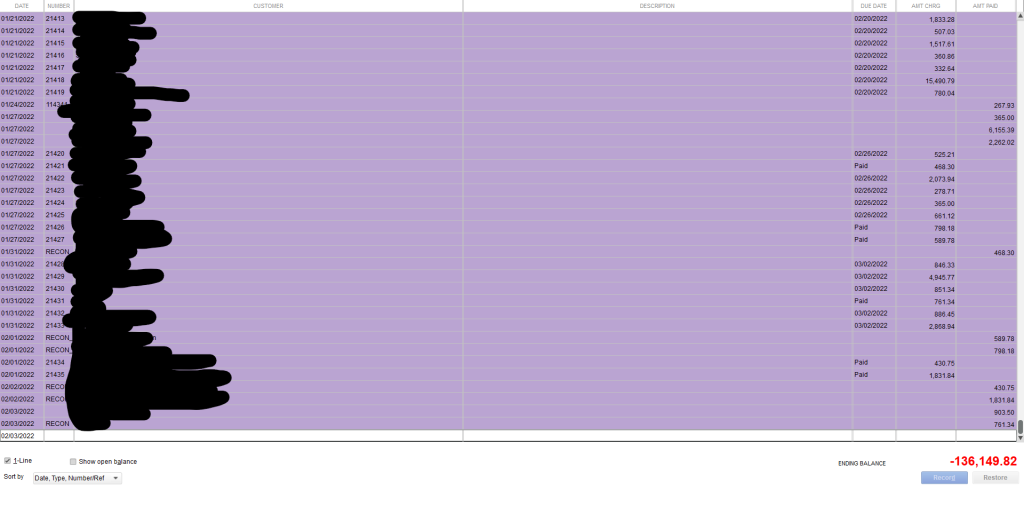
- After that, select the Amount that will make the report easier to read, and then select the “Paid Amount” column.
- Once done then click on the Ok tab.
- In the Paid Amount column, the ending balance should equal the amount that is out of balance. Look through the report for the transaction(s) that add up to this total.
Note: You can run Customer Report, Vendor Report, Journal Report, and Other Transactions if you can't discover the transaction that's generating the error.A. Filter by Year
Steps to use Filter by Year:
- From the date drop-down menu, select “All”.
- Next, choose the Year from the display columns.
- And then hit the Ok button.
- To find the month in which the balance sheet goes out of balance, compare the Total Assets and Liabilities.
B. Filter by Month
Steps to use Filter by Month:
- In this, you’re supposed to mention the year where the balance went out of balance from the relevant field.
- From the Display columns, select “Month” and then hit “Ok”.
- Finally, compare the balance of Total Liabilities and Total Assets.
C. Filter by Week
Steps to use Filter by week:
- Firstly, enter the appropriate month in which your balance sheet shows out-of-balance.
- Next, in the Display column, choose the correct week.
- After that, hit the Ok tab.
- At last, compare the balance to find the week where the balance sheet is mismatched.
E. Filter by Day
Steps to use Filter by day:
- The very first, enter the week which is showing out of balance.
- From the Display columns, choose the day followed by clicking on the “Ok” button.
- At last, compare the balance of Total Assets and Liabilities to find the day when the balance sheet went out of balance.
Step 4: Re-date the transactions
Now that you have reached here, find out the transactions/transactions that are causing the problem. You have to change the dates on them.
Steps to change the date transactions:
- Change the dates on the transactions that are causing the issue.
- Make a note of the dates that they are now available.
- Then, change the date to a date 20 years from now on each transaction.
- Each transaction should be saved separately.
- Refresh the report; the Paid Amount column should now be zero if you located the correct transactions.
- Locate the transactions you dated into the future and reverse the dates to their actual date.
- Note that this re-dating process re-links the transactions and allows them to be repaired.
If this fails, move on to the next step.
Step 5: Delete and re-enter the transactions
- If updating the transaction dates does not work, you should delete and re-enter the transactions.
Fix Issue: QuickBooks Trial Balance Out of Balance

Step 1: Incorrect data in the debits and credits inserted in the Trial Balance
To create the Trial Balance, you need to put both credit and debit balances from the ledger account in the credit and debit columns of the Trial Balance.
- Recheck the data you entered, and then add the columns from the top to the bottom and from the bottom to the top again to ensure the value remains the same.
Step 2: Not including Ledger Account balance on the Trial Balance
If you forgot to add any of the debit and credit balances in the Trial Balance, you will face this error.
- One of the columns on both credit and debit lists will be shorter than the other.
- Match them, subtract the amount of the shorter column from the larger column, and figure out the missing amount.
- Next, you will check all the ledger accounts to find out the missing amount.
Step 3: Jumbling up the debit/credit amount while putting them in the Trial Balance from the Ledger Accounts
When the balance is jumbled up in the Trial Account, for instance: the exchange of the debit and credit amounts in the respective columns.
- Follow the same procedure given in the aforementioned resolution, except you will need to divide the missing amount in half.
- Go through the ledger account to figure out the halved missing amounts, and you shall resolve the issue.
Step 4: synchronization Balance Sheet, Trial Balance, and Accounts Receivable Aging
- Go to QuickBooks and access the A/R Aging Report.
- Opt for
- There will be a section named Aging Method. Go for Report Date.
- Now select Run Report. If the Balance Sheet/ Trial Balance is running with Accrual as the reporting method, the final report will be balanced.
Fix the Negative Receivable Balance on the Balance Sheet in QuickBooks Desktop
Negative Accounts receivable usually arise when the user runs a balance sheet. A negative A/R balance refers to the business owes an amount to its customer in the theoretical concept. The Negative Account Receivable is generated through the Customer Payment window. This window is always used to credit the Accounts Receivable amount for a preferred customer.
When the amount has been received through the client but failed to get applied to an invoice, it takes place. It is essential to know that unapplied payments or credit are not applied because they will create conflicts in the profit and loss reports.
You have to perform the below-given modification to avoid the problem of Accounts Receivable appearing on the balance sheet:
- Locate Customer Payment Window
- Discover the checkbox named “This is a customer prepayment.”
- If chosen, it will force the software to credit another Current Liability account connected with the customer rather than crediting Accounts Receivable.
- Once the user is prepared to create an invoice, QuickBooks will provide an option of offering the prepayment in the Apply Credit Window.
- If the user selects the pre-payment, then the software will debit the other current liability account & credit the A/R account for the associated customer.
FAQ
How to resolve the transaction issue while maintaining the QuickBooks Balance Sheet balance?
To fix this error, you have to run a custom transaction detail report for the specific date that you noted. Then open the reports menu and choose Custom Reports. Hit the Next click on the Transaction detail. From the Edit Report window, view the report Report data range section. Now, you have to open the Report The Basis section. From the column section, split, and uncheck Account, and class. The last step is to click on the Ok button and you are all done with this program.
What reasons behind the balance sheet being out of balance?
As the resources increment, the value increments. In any case, if you have a lessening in resources or an increment in liabilities, the value diminishes. If this value estimation doesn’t create the distinction between your assets and liabilities, your balance sheet won’t balance.
What could cause the trial balance not to balance?
There are so many reasons for an Unbalanced Trial Balance. A trial balance may neglect to balance for a huge variety of causes. For instance, in any case, if you translated numbers while posting from the overall diary to the overall account or from the account to the trial balance sheet, this could cause the trial balance to not rise.
How would I know whether my trial balance is right?
To get to know, the first thing to do is double-check the balances on the trial balance worksheet by contrasting them with the totals via your journals and your general ledger. Be certain you didn’t make any errors while moving the account balances to the trial balance.
Which accounts are not considered to be in trial balance?
The post-closing balance incorporates just balance sheet accounts that are unable to be in the trial balance. You should not enable any income statement accounts, for example, the income and working business ledgers. Different accounts, for example, tax accounts, donations, and interests.
Speak to A Specialist about QuickBooks Software
Headache🥺. Huh, Save time & money with QuickBooks Support 24×7 @ +1-800-892-1352, we provide assistance to those who face problems while using QuickBooks (Support all U.S. & Canada Editions)
--- Support - We provide solutions for the following QuickBooks (Pro, Premier, Accountant, Enterprise, Payroll, Cloud) ---
- Error Support
- Data Import
- Data Conversion
- Payment Solutions
- Upgradation
- Payroll Support
- Data Export
- Software Integration
- QuickBooks Printer Support
- Complete QuickBooks Solutions
- Tax-Related Issues
- Data Damage Recovery
- Installation, Activation Help
- QuickBooks Windows Support
 1-800-892-1352
 Chat Now
 Schedule a Meeting