When users encounter problems while installing or uninstalling Accounting Software Desktop, it is often recommended to try the same in Selective Startup mode. This mode enables users to install or remove programs without influence from third-party software. Errors related to actions with this accounting software can be very frustrating. To ease your task, we’ve provided the steps to install or uninstall Accounting Software Desktop in Selective Startup mode in this article.
Steps to Install or Uninstall Accounting Software Desktop in Selective Startup
Before we start to install or uninstall Accounting Software Desktop in Selective Startup, we must prepare the data. There are two steps involved in this process. Let’s begin with the first one: back up your company file.
Backup Data
- Launch Accounting Software and go to the File menu.
- Select Single User Mode.
- Once Accounting Software relaunches, select File from the main menu.
- Click on Back up Company.
- Click on Create Local Backup. This means that the backup will be saved on a local drive.
- Later, you can transfer the backup file to a USB or server.
- A new window will appear; select Local Backup, then click on Next.
- Click on Ok when you’re ready to begin the backup process.
- Click on Finish when you get the confirmation that a backup file was created.
You’ll also require your Accounting Software product and license keys if you’re planning to install or reinstall the software. There are multiple methods through which you can find the product and license keys for the Accounting Software Desktop.
To find the product and license keys
- Launch Accounting Software Desktop.
- Press the F2 key.
- Look under the Product Information window. Here you’ll find the product name and number and license number. Also, note down the release of your version of Accounting Software.
Once you’ve prepared your data, you’re ready to install or uninstall the software.
Read More: How to Use Accounting Software Clean Install Tool
Step 1: Switch to Selective startup
The selective startup mode is used to ensure that third-party software doesn’t interfere with the function of other software. If you’re comfortable with working with Windows, then follow along:
- Log in to Windows with an admin account.
- Press Windows + R, then type in MSConfig. Hit ok.
- From the General tab, select Selective Startup. Also, mark the checkbox against Load system services.
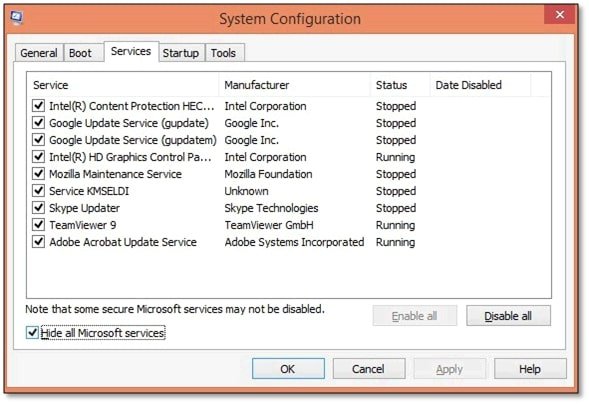
- From the Services tab, select Hide all Microsoft services.
- Click on Disable All.
- Uncheck the checkbox against Hide all Microsoft Services.
- Mark the checkbox against Windows Installer, then hit ok.
- Go to the System Configuration window. Select Restart.
You’ve successfully started your system in Selective startup mode. Errors encountered when undertaking the aforementioned steps are usually due to a lack of administrative privileges.
Step 2: Install or Uninstall Accounting Software Desktop
Now, you’re free to install or uninstall Accounting Software without interference from third-party software. Since all of your security software won’t be running, you can install any program you like.
To uninstall Accounting Software Desktop
- Log in to Windows with an admin account.
- Hit the Windows key and select Control Panel.
- Click on Programs & Features.
- Select Uninstall a Program.
- Select Accounting Software and click on Uninstall.
- Follow the onscreen procedure to complete the process. Click on Finish.
To install Accounting Software Desktop in selective startup mode, follow the steps provided below:
- Either download the setup or insert the installation disk.
- Launch the setup for your version of Accounting Software.
- Accept the license agreement.
- Select the folder in which you want to install Accounting Software. Click Next.
- Select Express Install. If you want to install it on a network, select Custom Install.
- Wait for the installation to finish. Click on Finish.
Read More: Use Accounting Software Install Diagnostic Tool
When you uninstall Accounting Software, it does not delete the company file. The company file will remain as is and won’t be impacted in any manner. However, if you install a newer version of this accounting software, you’ll have to upgrade the company file. This can be done directly through Accounting Software. Once a QB company file is upgraded, you cannot downgrade it. So make sure that you keep a backup copy stored on a USB or separate server.
Speak to A Specialist about QuickBooks Software
Headache🥺. Huh, Save time & money with QuickBooks Support 24×7 @ +1-800-892-1352, we provide assistance to those who face problems while using QuickBooks (Support all U.S. & Canada Editions)
--- Support - We provide solutions for the following QuickBooks (Pro, Premier, Accountant, Enterprise, Payroll, Cloud) ---
- Error Support
- Data Import
- Data Conversion
- Payment Solutions
- Upgradation
- Payroll Support
- Data Export
- Software Integration
- QuickBooks Printer Support
- Complete QuickBooks Solutions
- Tax-Related Issues
- Data Damage Recovery
- Installation, Activation Help
- QuickBooks Windows Support
 1-800-892-1352
 Chat Now
 Schedule a Meeting